If your iPhone 16 Pro Max is showing reduced performance or the battery maximum capacity has dropped below 80%, it’s time to replace your battery. In this guide, we’ll walk you through the full process of replacing your iPhone battery, calibrating it, and fixing the ‘Unknown Part’ error message.
Tools Needed for Battery Replacement
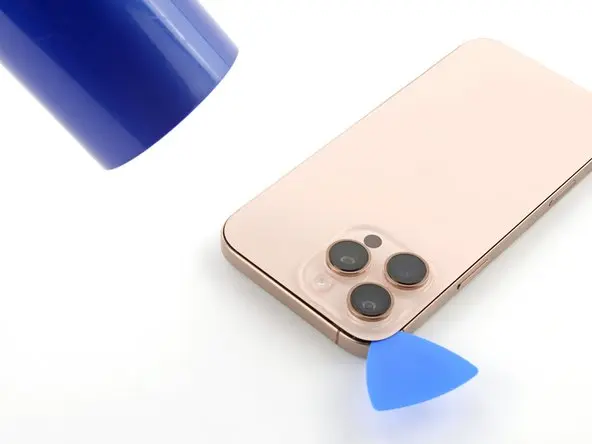
Before starting, make sure you have the following tools:
- Screwdrivers: Pentalobe 0.8 mm, Tri-Wing 0.8 mm
- Tweezers & Plastic Pry Tools
- Suction Cup
- Screen Disassembly Tool – essential for safely separating the screen from the chassis
- Waterproof Adhesive Tape
- Battery Adhesive Strips
- Magnetic Mat – optional but recommended to organize screws and small parts
Pro Tip: Using a magnetic mat helps prevent losing screws during disassembly, making reassembly much easier.
You can find links to all required tools and replacement batteries in the video description.
Preparing Your iPhone for Disassembly
- Turn off your iPhone by pressing and holding the volume up and power buttons.
- Remove the two screws near the charging port.
- Warm the back glass with a hairdryer (or heat gun set to 90°C) for about a minute. This softens the adhesive and makes removal easier.
- Use a suction cup near the bottom edge and gently lift, then insert a plastic pry tool into the gap.
- Heat each edge of the back glass as you work, and don’t insert the tool deeper than 3 mm to avoid internal damage.
A warm surface is key to safely removing the back glass without cracking it.
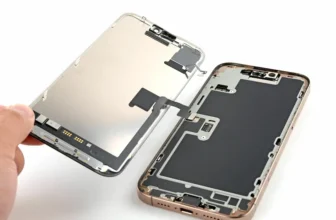
Removing the Back Glass
- At the top, two metal hinges hold the glass. Slide the back glass down using a pry tool to release it.
- Lift the back glass carefully, watching the cable connected to the logic board.
- Remove screws securing the battery and back glass connector covers.
Disconnecting Battery Cables
- Use a plastic spudger to disconnect the battery and back glass cables.
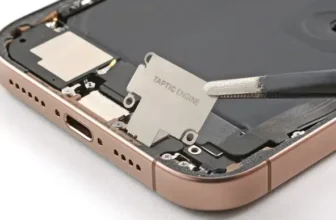
- Remove the Taptic Engine and bottom speaker to safely access the battery adhesive strips.
- Unscrew and remove the Taptic Engine cover, then disconnect its cable.
- Remove the Taptic Engine and bottom speaker.
Removing Battery Adhesive Strips
The battery is held by three stretch-release adhesive strips:
- Carefully peel the black pull-tab using tweezers.
- Pull slowly to release the adhesive.
- If a strip breaks, apply a small amount of isopropyl alcohol beneath the battery to soften the adhesive.
Always use caution near the battery to avoid punctures.
Installing the New Battery
- Apply new adhesive strips to the back of the replacement battery.
- Place the battery in the housing, aligning the cable connector with the socket on the logic board.
- Press down slightly to secure the battery.
- Reassemble the iPhone and power it on to test the new battery.
Calibrating the Replacement Battery
To ensure full functionality:
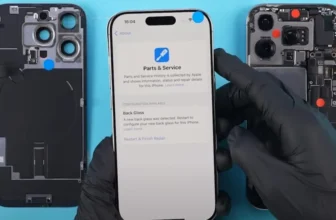
- Open Settings > General > About > Parts & Service History.
- Tap Restart & Finish Repair using Repair Assistant.
- Ensure your iPhone is connected to Wi-Fi and has more than 20% battery.
- Follow the on-screen instructions to complete calibration.
- After reboot, check Battery Health to confirm maximum capacity and cycle count.
Troubleshooting Repair Issues
- Ensure stable Wi-Fi and battery > 20%.
- Restart your iPhone and retry if calibration fails.
- Check that the battery cable is securely connected.
- Note: Third-party batteries may not work with Repair Assistant. They may display ‘Unknown Part’ but are still usable.
- Batteries protected by Activation Lock require unlocking the previous Apple account.
Restoring Water Resistance
- Remove old adhesive tape from the frame.
- Apply new waterproof adhesive tape around the iPhone frame.
- Use isopropyl alcohol to clean residual adhesive before applying new tape.
- Press down with a plastic spudger and remove the front liner.
- Reconnect back glass cable and battery, then secure with screws.
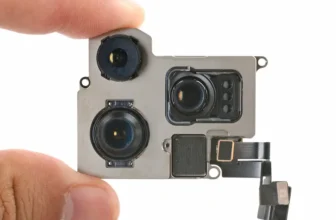
Clean camera lenses with a rubber blower for a professional finish.
Final Assembly & Testing
- Press down around the edges to seal the back glass.
- Fasten the two screws near the charging port.
- Power on your iPhone and verify battery performance.
Your iPhone 16 Pro Max battery replacement is now complete!
FAQ
Q1: How long does battery replacement take?
A: Typically 30–60 minutes, depending on experience and tools used.
Q2: Can I use a third-party battery?
A: Yes, but Repair Assistant may show ‘Unknown Part’. Calibration may be limited.
Q3: Will water resistance be affected?
A: Only if old adhesive isn’t replaced. Always apply new waterproof sealing tape.
Q4: How do I calibrate the battery?
A: Use the Repair Assistant through Settings > General > About > Parts & Service History.