If your iPhone 16 Pro Max Face ID is not working, disabled, or the front camera has stopped functioning, the issue is usually related to a damaged Face ID module. This module contains multiple sensors responsible for facial recognition and secure unlocking.
In this step-by-step repair guide, you’ll learn how to replace the iPhone 16 Pro Max Face ID module, restore functionality, calibrate the device properly, and safely reseal the phone after repair.
🔧 Tools Required for Face ID Repair
Before starting, prepare these tools:
- Pentalobe screwdriver (0.8 mm)
- Tri-Wing screwdriver (0.8 mm)
- Tweezers
- Plastic pry tools / spudger
- Suction cup
- Screen disassembly tool
- Waterproof adhesive sealing tape
- Hair dryer or heat gun (90°C recommended)
- Magnetic screw mat (recommended)
Using proper tools reduces the risk of damaging sensitive internal components.
⚠️ Important Preparation Steps
- Power off your iPhone:
- Press and hold Power + Volume Up.
- Remove the two screws near the charging port.
- Keep screws organized to avoid confusion during reassembly.
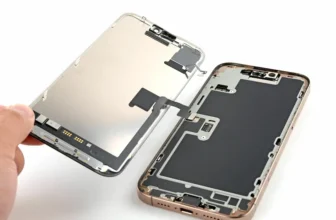
🔥 Step 1: Heating and Removing the Back Glass
The Face ID module sits internally, so the device must be opened carefully.
Heat the Back Panel
- Warm the back glass for about 1 minute.
- Heat gun temperature: 90°C (safe for adhesive softening).
Separate the Glass
- Place a suction cup at the bottom edge.
- Gently lift to create a gap.
- Insert a thin blade carefully.
- Slide a plastic pry tool around edges.
⚠️ Do not insert tools deeper than 3 mm.
At the top section, slide the panel slightly downward to release hinge clips before lifting.
🔌 Step 2: Disconnect Battery and Back Glass Cable
Before removing internal parts:
- Unscrew connector shields.
- Disconnect:
- Battery connector
- Back glass cable
This prevents electrical damage during repair.
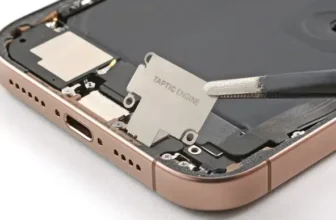
📷 Step 3: Remove the Old Face ID Module
- Disconnect Face ID flex cables.
- Carefully remove the module.
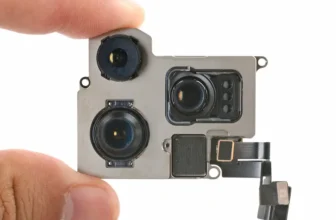
The Face ID assembly includes:
- Front camera
- Infrared camera
- Dot projector
If Face ID is disabled or the selfie camera fails, replacing this module typically resolves the issue.
🆕 Step 4: Install the New Face ID Module
- Position the replacement module correctly.
- Reconnect all cables securely.
- Reassemble internal components in reverse order.
Once assembled, power on the iPhone to begin testing.
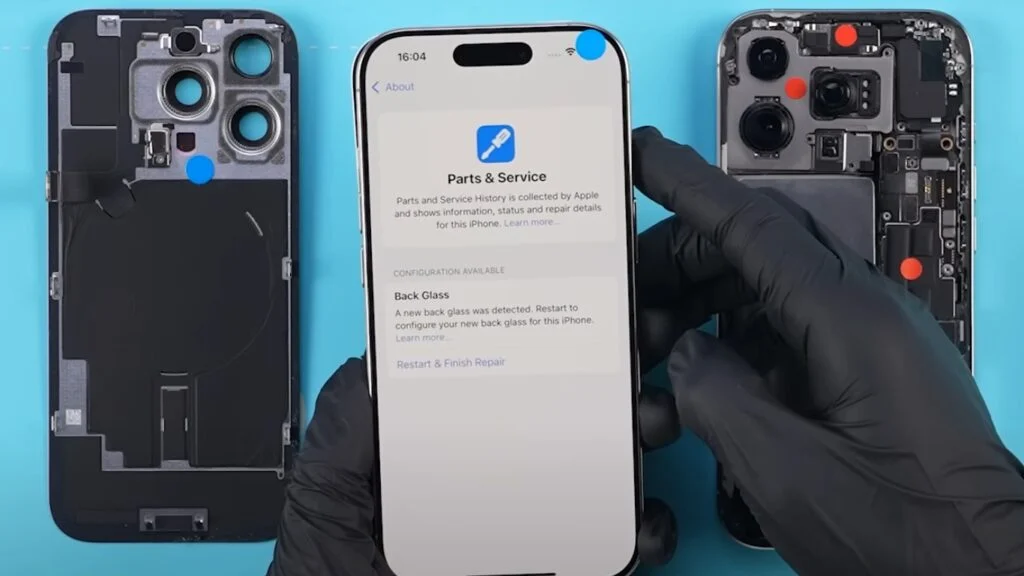
⚙️ Step 5: Calibrate Face ID Using Repair Assistant
After replacement, calibration is required for full functionality.
Calibration Steps
- Go to Settings → General → About
- Open Parts & Service History
- Tap Restart & Finish Repair
- Connect to stable Wi-Fi
- Ensure battery level is above 20%
The Repair Assistant will configure and calibrate the Face ID system automatically.
After completion, restart the iPhone.
🛠️ Troubleshooting Face ID Calibration Issues
If calibration fails:
- Ensure stable internet connection
- Charge device above 20%
- Restart and retry calibration
- Recheck module connection
- Verify replacement part compatibility
Some third-party parts may show an “Issue” status in Parts & Service History until calibration completes.
✅ Step 6: Test Face ID and Front Camera
After calibration:
- Set up Face ID again.
- Test:
- Face unlock
- Front camera
- Portrait mode
- Face recognition speed
Confirm everything works before sealing the device.
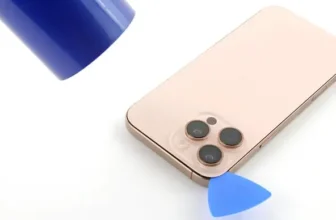
💧 Step 7: Restore Water Resistance
Opening the iPhone breaks factory sealing, so waterproofing must be restored.
Apply New Adhesive Seal
- Remove old adhesive.
- Clean frame using 91%+ isopropyl alcohol.
- Align waterproof adhesive tape precisely.
- Press evenly around the frame.
Use a rubber blower to remove dust from lenses before closing.
🔧 Step 8: Final Assembly
- Reconnect back glass cable and battery.
- Secure all screws.
- Press edges firmly to reseal back glass.
- Reinstall bottom screws near charging port.
Your Face ID repair is now complete.
🔗 Related iPhone Guides & Mobile Updates
For more smartphone repair tutorials, price updates, and mobile comparisons in Pakistan, explore:
You can also check other iPhone repair guides and latest mobile information before deciding whether repair or upgrade is the better option.
❓ FAQ — iPhone 16 Pro Max Face ID Repair
1. Why is Face ID not working on my iPhone 16 Pro Max?
Usually due to hardware damage from drops, water exposure, or a faulty Face ID sensor module.
2. Can Face ID be repaired at home?
Yes, but it requires careful handling and proper calibration using Apple’s Repair Assistant.
3. Do I need calibration after replacing Face ID?
Yes. Without calibration, Face ID may remain disabled.
4. Will third-party parts work with Face ID?
Some work properly, but others may show warnings in Parts & Service History.
5. Does repair affect water resistance?
Yes — unless new waterproof adhesive sealing tape is installed.