If your iPhone 16 Pro Max rear camera is not working, showing a black screen, failing to focus, or crashing when opening the camera app, the problem is often caused by a damaged camera module. Fortunately, replacing the rear camera can restore full functionality without replacing the entire device.
In this complete DIY repair guide, you’ll learn how to replace the iPhone 16 Pro Max rear camera module step by step, including calibration, troubleshooting, and restoring water resistance after repair.
🔧 Tools Required for iPhone 16 Pro Max Camera Repair
Before starting, prepare these tools:
- Pentalobe screwdriver (0.8 mm)
- Tri-Wing screwdriver (0.8 mm)
- Phillips screwdriver (1 mm)
- Tweezers
- Plastic pry tools / spudger
- Suction cup
- Screen disassembly tool
- Waterproof adhesive sealing tape
- Hair dryer or heat gun (90°C recommended)
- Magnetic mat (recommended for organizing screws)
Using proper tools reduces the risk of internal damage during disassembly.
⚠️ Important Preparation Before Disassembly
- Power off your iPhone:
- Press and hold Power + Volume Up buttons.
- Remove the two screws near the charging port.
- Work slowly and keep screws organized using a magnetic mat.
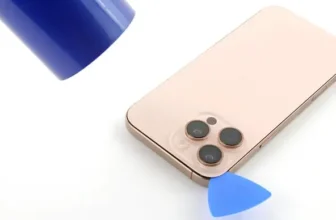
🔥 Step 1: Heat and Remove the Back Glass
The rear glass is secured with strong adhesive.
- Heat the back glass for about 1 minute.
- If using a heat gun, set temperature to 90°C.
- The glass should feel warm but not extremely hot.
Removing the Glass
- Place a suction cup near the bottom edge.
- Gently lift to create a small gap.
- Insert a thin blade carefully.
- Slide a plastic tool around the edges.
⚠️ Do not insert tools deeper than 3 mm to avoid damaging internal parts.
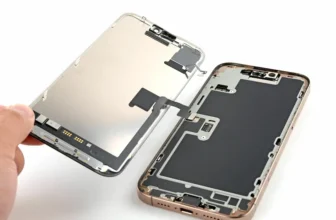
🔩 Step 2: Open the Back Panel
At the top, two metal hinges hold the back glass:
- Slide the panel downward gently.
- Lift carefully because a cable connects it to the logic board.
🔌 Step 3: Disconnect Battery and Back Glass
- Remove screws securing connector covers.
- Disconnect:
- Battery connector
- Back glass cable
Always disconnect the battery first to prevent short circuits.
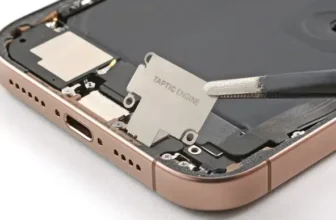
📡 Step 4: Remove the LiDAR Sensor
- Disconnect the cable.
- Remove two screws securing the LiDAR sensor.
- Carefully lift and remove it.
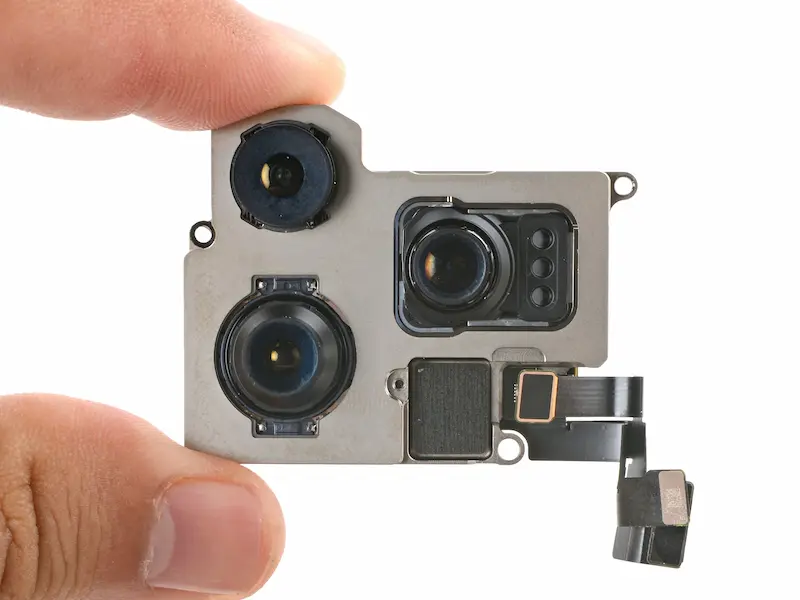
📷 Step 5: Remove the Rear Camera Module
- Disconnect the two camera cables.
- Remove the mounting screws.
- Carefully lift out the camera module.
If your camera shows a black screen or fails after a drop, replacing this module usually fixes the issue.
🆕 Step 6: Install the New Camera Module
- Place the replacement rear camera into position.
- Secure it with screws.
- Reconnect both camera cables.
Make sure connectors click firmly into place.
🔄 Step 7: Reassemble the iPhone
Reattach all components in reverse order:
- Install LiDAR sensor
- Reconnect battery
- Reconnect back glass cable
- Secure brackets and screws
Power on the device to test basic functionality before sealing completely.
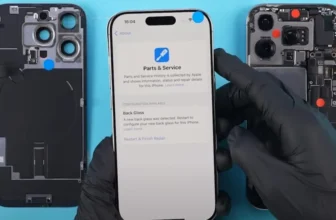
⚙️ Step 8: Calibrate Camera Using Repair Assistant
After replacement, Apple requires calibration for optimal camera performance.
Follow these steps:
- Go to Settings → General → About
- Open Parts & Service History
- Tap Restart & Finish Repair
- Connect to Wi-Fi
- Ensure battery is above 20%
During calibration:
- Focus camera on different objects when prompted.
- Maintain stable internet connection.
Once complete, restart the iPhone.
❗ Repair Assistant Not Working? (Fixes)
Try these solutions:
- Use stable Wi-Fi connection
- Charge battery above 20%
- Restart device and retry
- Reconnect camera cables properly
- Ensure replacement module is correctly installed
👉 Some third-party cameras may display “Unknown Part”, but the camera can still work normally.
✅ Step 9: Test Camera Functions
After calibration, test:
- Rear camera photo mode
- Video recording
- Focus accuracy
- Zoom performance
- Lens switching
Make sure images are clear and stable.
💧 Step 10: Restore Water Resistance
Opening the iPhone breaks the original waterproof seal.
Restore protection:
- Remove old adhesive tape.
- Clean residue using isopropyl alcohol (91%+).
- Apply new waterproof sealing tape carefully.
- Align tape precisely with frame edges.
- Press adhesive firmly using a plastic tool.
Use a rubber blower to remove dust from camera lenses before closing.
🔧 Step 11: Final Assembly
- Reconnect all cables.
- Seal the back glass by pressing evenly around edges.
- Reinstall bottom screws near charging port.
Your rear camera repair is now complete.
🔗 Related Repair Guides You May Find Helpful
If you’re repairing Apple devices, explore more tutorials and tech guides here:
You’ll find device repair tips, smartphone comparisons, and latest mobile price updates in Pakistan.
❓ FAQ — iPhone 16 Pro Max Rear Camera Repair
1. Why is my iPhone 16 Pro Max camera showing a black screen?
Usually caused by hardware damage after a drop or internal camera module failure.
2. Do I need calibration after replacing the camera?
Yes. Repair Assistant calibration ensures proper focus and full functionality.
3. Can I use a third-party replacement camera?
Yes, but it may show an Unknown Part message in settings.
4. Will water resistance return after repair?
Only if new waterproof adhesive sealing tape is installed.
5. How long does camera replacement take?
Typically 60–90 minutes depending on experience level.