If your iPhone 17 Pro battery is draining fast, shutting down unexpectedly, or showing a Battery Health service warning, replacing the battery can restore full performance.
In this guide, you’ll learn how to safely replace the iPhone 17 Pro battery, test it properly, and restore water resistance after reassembly.
Why You May Need to Replace the iPhone 17 Pro Battery
Common signs include:
- Battery Health below 80%
- Rapid battery drain
- Unexpected shutdowns
- Overheating during use
- “Service” warning in Settings
If you notice these issues, a battery replacement is often the best solution.
Tools Required for iPhone 17 Pro Battery Replacement
Before starting, gather the following:
- Precision screwdriver set (Pentalobe 0.8mm, T4 Torx, Phillips 1mm)
- Plastic pry tools
- Tweezers
- Suction cup
- Screen opening tool
- 9V battery with two wires and clamps (for adhesive release method)
- Replacement battery
- Battery adhesive
- Waterproof sealing adhesive
- Magnetic mat (recommended)
Proper organization prevents mistakes during reassembly.
Step 1: Power Off and Remove Bottom Screws
- Turn off your device completely.
- Remove the two screws near the USB-C port.
Step 2: Heat and Open the Display
The display is sealed with waterproof adhesive.
- Apply controlled heat (90°C / 194°F) for 60–90 seconds.
- Use a suction cup to lift the screen slightly.
- Insert a plastic pry tool and carefully work around the edges.
- Release the top hinges and open the display like a book.
Step 3: Disconnect the Display
- Remove the bracket covering the connectors.
- Disconnect display and front sensor cables.
Set the display aside safely.
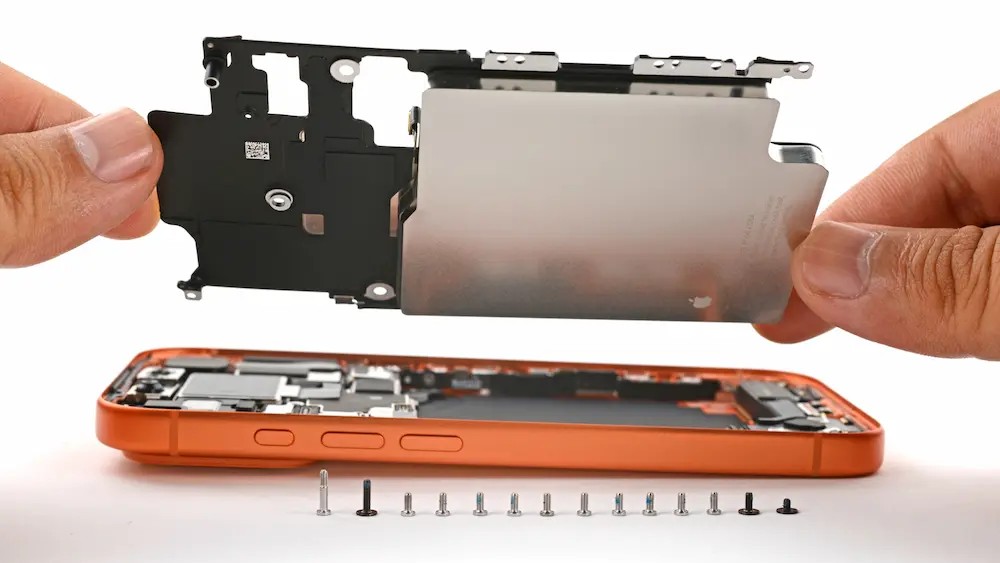
Step 4: Remove the Cooling Plate and Battery
- Remove the 14 screws securing the cooling plate.
- Lift the battery and cooling plate assembly carefully.
Genuine vs Aftermarket Battery Installation
If Using a Genuine Battery
If it comes pre-attached with a cooling plate:
- Skip separation
- Install directly
If Using Aftermarket Battery
You must separate the old battery from the cooling plate.
9V Battery Adhesive Removal Method
- Peel back the black battery tab.
- Attach:
- Red clamp → silver contact
- Black clamp → uncoated cooling plate area
- Connect to 9V battery.
- Hold for about 90 seconds.
This weakens adhesive and allows safe removal.
Install the New Battery
- Apply battery adhesive if not pre-installed.
- Firmly bond battery to cooling plate.
- Reinstall assembly into phone.
Test Before Final Sealing
- Reconnect display.
- Power on device.
- Confirm normal boot.
- Check battery percentage display.
Run a short 10-minute performance test to ensure stability.
Calibrate the New Battery
Go to:
Settings → General → About → Parts & Service History
Follow the on-screen instructions for calibration.
Restore Water Resistance
- Remove old adhesive from frame.
- Clean residue with 91%+ isopropyl alcohol.
- Apply new waterproof sealing tape.
- Press firmly around edges.
Final Assembly
- Reconnect cables.
- Secure bracket.
- Close display.
- Reinstall bottom screws.
Your iPhone 17 Pro battery replacement is complete.