
If your iPhone 15 Pro Max is experiencing fast battery drain or shows a battery health below 80%, it’s time for a replacement. This comprehensive guide will walk you through safely removing the old battery, installing a new one, and restoring water resistance.
Tools Needed for iPhone 15 Pro Max Battery Replacement
Before you begin, gather the following tools:
- Screwdrivers: Pentalobe 0.8 mm, Tri-Wing 0.8 mm, Phillips 1 mm, Standoff 1.5 mm
- Plastic Pry Tools & Spudger
- Suction Cup
- Screen Disassembly Tool
- Tweezers
- Waterproof Sealing Tape & Battery Adhesive Strips
- Magnetic Mat – helps organize screws during disassembly
Tip: Using a magnetic mat ensures screws stay in place, making reassembly easier.
Links to all tools and compatible replacement batteries can be found in the video description.
Preparing Your iPhone for Disassembly
- Turn off your iPhone.
- Remove the two Pentalobe screws near the charging port.
- Heat the bottom edge of the iPhone with a hair dryer for ~1 minute to soften the adhesive.
- Attach a suction cup to the screen’s bottom edge and gently lift.
- Insert the blade edge into the thin gap between the screen and chassis to begin separation.
⚠️ Avoid inserting the tool too deeply to prevent damage to internal components, especially the Face ID module.
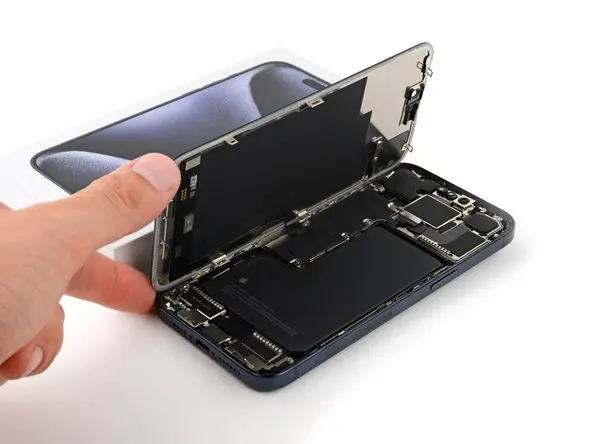
Screen Disassembly
- Gradually separate the screen from the chassis using the Screen Disassembly Tool.
- Be careful with sudden movements; the screen cable is still connected.
- Remove screws securing the battery and display connectors, then use a plastic spudger to disconnect the battery and display cables.
- Remove the screen safely.
Removing the Battery
- Remove any obstructing components before accessing the battery.
- The battery is glued with adhesive strips to the rear case. Use tweezers to slowly pull the strips evenly.
- If a strip breaks, apply isopropyl alcohol underneath to soften the adhesive, then gently pry up the battery.
⚠️ Take care not to puncture the battery while removing it.
Installing the New Battery
- Use adhesive strips to secure the new battery in place. Double-sided tape is an alternative, but adhesive strips are easier for future replacements.
- Align the battery cable connector with the socket on the logic board.
- Press gently to secure the battery.
- Reassemble your iPhone and power it on to test the new battery.
Testing & Common Issues
- After installation, you may see a message: “Unable to verify this iPhone has a genuine Apple battery.”
- Even original Apple batteries may show this.
- This does not affect functionality, though battery health info may not display.
- For resolving the Battery Service Message, see our separate tutorial linked in the video description.
Restoring Water Resistance
- Remove old adhesive tape from the iPhone’s frame.
- Clean any residue with isopropyl alcohol and a cotton swab.
- Apply new waterproof adhesive tape, aligning carefully around the iPhone perimeter.
- Press down with a spudger and remove the front liner from the adhesive.
- Reattach the display and secure with the two Pentalobe screws near the charging port.
This restores your iPhone’s water resistance for continued protection.
Finishing Touches
- Press the display evenly around the perimeter.
- Ensure all components are securely connected.
- Power on your iPhone and confirm proper battery operation.
Battery replacement is now complete!
FAQ
Q1: How long does it take to replace the iPhone 15 Pro Max battery?
A: Typically 30–60 minutes depending on experience and tools.
Q2: Can I use a third-party battery?
A: Yes, but your iPhone may display a “Unable to verify battery” message. Functionality is unaffected.
Q3: Will water resistance be affected?
A: Only if old adhesive tape isn’t replaced. Always use new waterproof sealing tape.
Q4: How do I handle a broken adhesive strip?
A: Apply isopropyl alcohol under the battery and gently pry it up using a plastic spatula.

