If your Samsung Galaxy S10+ can’t survive a full day anymore, you’re not alone. Over time, every smartphone battery gets weaker. You start charging it again and again, and it becomes frustrating.
The good news? You don’t always need a new phone. A simple battery replacement can bring your S10+ back to life.
In this guide, we’ll walk through the full process in a simple way so you understand what actually happens inside your phone during a battery replacement.
Why Your Samsung Galaxy S10+ Battery Gets Worse Over Time
Let’s start with the real problem.
Lithium-ion batteries naturally wear out. The more you use your phone, the more the battery slowly loses its capacity.
You may notice:
- Battery draining very fast
- Phone shutting down unexpectedly
- Charging multiple times a day
- Overheating during use
This happens even if you take good care of your phone. It’s normal wear and tear.
A new battery can completely fix these issues and make your phone feel almost new again.
Tools You Need for Galaxy S10+ Battery Replacement
Before starting, you need the right tools. This is important because the S10+ is tightly sealed with adhesive and small screws.
Here’s what you’ll need:
- Opening tools (like iFixit kit)
- Suction cup
- Plastic opening picks
- Small Phillips screwdriver (#00)
- Tweezers
- Spudger tool
- Heat pad or iOpener
- Isopropyl alcohol (90% or higher)
- Adhesive remover (optional)
- Magnetic mat (to organize screws)
These tools help you open the phone safely without damaging internal parts.
Safety First: Before You Start the Repair
This step is very important and often ignored.
Before opening your phone:
- Make sure battery level is below 25%
- Work in a clean, dry space
- Turn off the phone completely
Why low battery?
Because if a battery is accidentally damaged during repair, a charged battery can be dangerous.
Taking small safety steps reduces risk and keeps the repair safe.
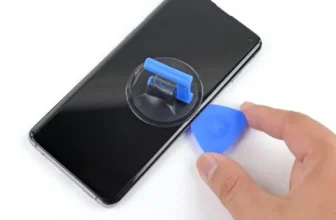
Opening the Back Cover of the Galaxy S10+
The S10+ has a strong adhesive holding the back glass in place. You cannot open it without heat.
Here’s how the process works:
First, heat the back panel using a heat pad or hair dryer. This softens the glue.
Then:
- Place a suction cup on the warmed area
- Pull gently to create a small gap
- Insert a plastic pick into the opening
Once the pick is inside, slide it around the edges to cut the adhesive.
You’ll repeat this process:
- Heat
- Lift
- Slide
Do this around all sides of the phone.
If the glue feels too strong, more heat or a hair dryer can help soften it further.
Once the adhesive is fully cut, the back glass can be removed safely.
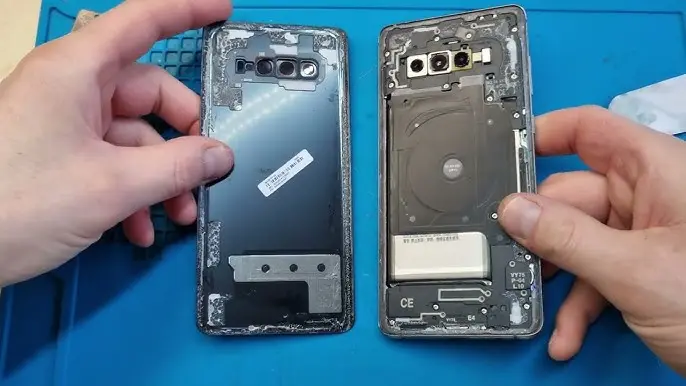
Removing Internal Components Carefully
After opening the phone, you will see several internal parts.
The next step is to remove:
- Screws holding the NFC coil and speaker module
- Wireless charging and antenna components
These parts are held by many small screws, so keep them organized carefully.
Once screws are removed:
- Use a spudger tool to lift and remove the components
After that, you must disconnect the battery connector. This is very important because it cuts power to the phone and makes the repair safer.
Now the phone is ready for battery removal.
Removing the Old Battery from Galaxy S10+
The battery is glued strongly inside the phone, so it won’t come out easily.
To remove it safely, you use isopropyl alcohol.
Here’s the process:
- Apply a few drops of alcohol around the battery edges
- Let it sit for about a minute
- Tilt the phone slightly so the liquid spreads under the battery
The alcohol helps weaken the adhesive.
After waiting:
- Use a plastic card or pry tool
- Gently lift the battery
If it doesn’t move, add more alcohol and wait again. Never force it, because the battery can be damaged.
Once the battery comes out, you’re halfway done.
Installing the New Battery
Now it’s time to install the replacement battery.
Before placing it:
- Add new adhesive to the back of the battery
Then:
- Place the battery into its original position
- Connect it back to the motherboard carefully
Make sure the connection is secure and properly aligned.
This step is simple but very important. A loose connection can cause charging issues later.
Reassembling the Galaxy S10+
After the battery is installed, you now rebuild the phone step by step.
You will:
- Reinstall the NFC coil and speaker module
- Tighten all screws carefully
- Reconnect all components properly
Then apply fresh adhesive around the edges of the back glass.
Finally:
- Press the back cover firmly into place
- Make sure it is sealed evenly on all sides
Let it sit for a few minutes so the adhesive bonds properly.
Final Thoughts: Is It Worth Replacing the Battery?
In most cases, yes.
Replacing the Galaxy S10+ battery is much cheaper than buying a new phone. It also brings back:
- Strong battery life
- Stable performance
- Better daily usability
The process is a bit technical, but not impossible if you follow each step carefully.
If your S10+ is still working fine except for battery life, a replacement is one of the best upgrades you can do.
FAQ – Galaxy S10+ Battery Replacement
1. How do I know if my S10+ battery needs replacement?
If your phone drains quickly or shuts down early, the battery is likely worn out.
2. Can I replace the S10+ battery myself?
Yes, but you need proper tools and basic repair skills.
3. Is heating the phone safe during opening?
Yes, if done carefully. Heat only softens adhesive, it does not damage the phone.
4. What liquid is used to remove the battery?
Isopropyl alcohol helps loosen the glue holding the battery.
5. How long does battery replacement take?
Usually between 30 minutes to 1 hour depending on experience.
6. Will a new battery make my phone like new again?
In most cases, yes. You’ll notice much better battery life and performance.