If your iPhone 12 Pro battery drains too fast, you’re not alone. Over time, every iPhone battery starts losing power. You go from a full-day phone to something that barely survives a few hours.
The good news? You don’t need a new phone. A battery replacement can completely fix the problem and make your iPhone feel fresh again.
Let’s walk through the full repair process in a simple and clear way.
Why iPhone 12 Pro Battery Dies Over Time
All lithium-ion batteries degrade with use. It’s normal.
You may notice:
- Battery draining quickly
- Phone shutting down early
- Charging multiple times a day
- Slower performance during heavy use
This happens even if you use your phone carefully. It’s just how batteries work.
Replacing the battery restores normal performance and battery life.
Tools You Need for iPhone 12 Pro Battery Replacement
Before starting, gather the right tools. This repair needs precision.
You’ll need:
- iOpener or heat pad
- Suction cup or iSclack tool
- Opening picks
- Spudger tool
- Phillips screwdriver (#00)
- Pentalobe driver
- Y000 screwdriver
- Standoff driver
- SIM eject tool
- Tweezers
- Isopropyl alcohol (90%+)
- Replacement battery
- Battery adhesive strips
Having everything ready makes the repair much smoother.
Important Safety Tips Before You Start
This step is very important.
Before opening your iPhone:
- Power it off completely
- Make sure battery is below 25%
Why?
A charged lithium battery can be dangerous if damaged during repair.
Also, keep screws organized—iPhones use many tiny screws that are easy to mix up.
Opening the iPhone 12 Pro
Start by removing the SIM tray using a SIM eject tool.
Then:
- Remove the two pentalobe screws at the bottom
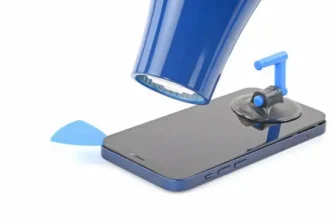
Now comes the important part: opening the display.
The screen is glued tightly to the frame, so you must soften the adhesive.
Steps:
- Heat the bottom edge using iOpener or hair dryer
- Place suction cup near the heated area
- Pull gently to create a gap
- Insert opening pick into the gap
Now slide the pick around the edges slowly:
- Left side first
- Bottom edge
- Right side
- Top edge
Take your time. The adhesive is strong.
Removing the Display Safely
Once the screen is loose, open it like a book.
But don’t rush—there are cables connected inside.
Hold the display at about 90 degrees.
Now:
- Remove connector covers using Y000 driver
- Disconnect battery cable first
- Disconnect display and sensor cables
After this, the display can be fully removed.
Removing Internal Components
To access the battery, you must remove some parts first.
You’ll take out:
- Loudspeaker
- SIM card reader
- Taptic Engine
These are held by small screws, so keep everything organized carefully.
After removing them, you’ll finally see the battery.
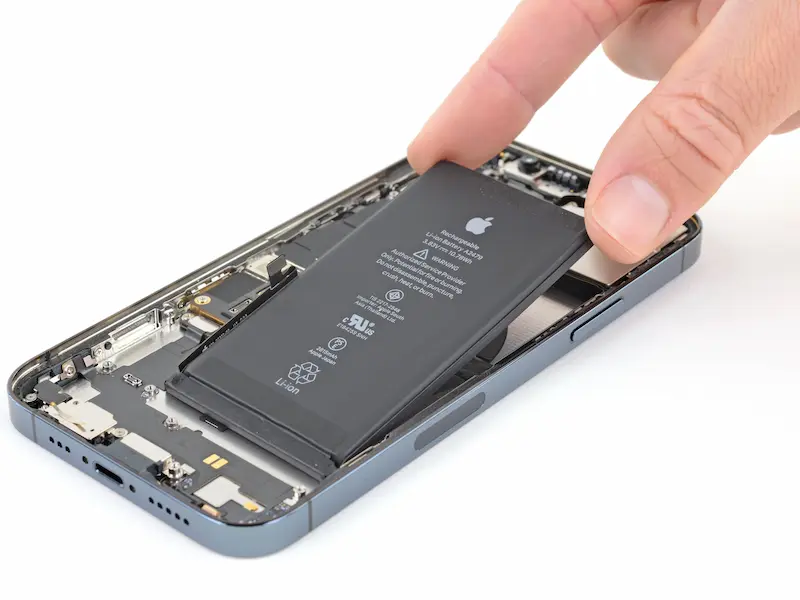
Removing the iPhone 12 Pro Battery
The battery is glued with adhesive strips. There are four pull tabs.
Here’s how to remove it:
- Peel back all pull tabs carefully
- Pull each strip slowly and evenly
Important:
- Don’t rush
- Don’t tear the strip if possible
- Keep steady tension while pulling
If a strip breaks:
- Use isopropyl alcohol to loosen adhesive
- Try again gently
Once all strips are removed, the battery lifts out easily.
Installing the New Battery
Now comes reassembly.
Steps:
- Place new adhesive strips or glue
- Insert the new battery into position
- Connect battery cable to logic board
Make sure everything is aligned properly. A loose connection can cause charging issues later.
Reassembling the iPhone 12 Pro
Now put everything back step by step:
- Reinstall Taptic Engine
- Reinstall SIM card reader
- Reinstall loudspeaker
- Reconnect all cables carefully
Then:
- Reconnect display cables
- Secure connector covers with screws
Double-check everything before closing the phone.
Closing the Phone Properly
Before sealing:
- Power on the phone and test it
If everything works:
- Apply new adhesive to the frame
- Align display with top clips
- Press screen gently into place
Finally:
- Reinstall bottom pentalobe screws
- Insert SIM tray
Your iPhone is now fully reassembled.
Final Thoughts: Is Battery Replacement Worth It?
Yes—100%.
Replacing the iPhone 12 Pro battery:
- Restores full-day battery life
- Improves performance stability
- Costs much less than a new phone
If your phone is still in good condition, this repair is one of the smartest upgrades you can do.
FAQ – iPhone 12 Pro Battery Replacement
1. How do I know my iPhone 12 Pro battery is bad?
If it drains quickly or shuts down early, the battery is worn out.
2. Can I replace the battery myself?
Yes, but it requires tools and patience.
3. Is opening the iPhone difficult?
Yes, the screen is tightly glued, but heat helps soften it.
4. What is the most important safety step?
Keeping battery below 25% before starting the repair.
5. How long does battery replacement take?
Usually 45 minutes to 1.5 hours depending on experience.
6. Will new battery improve performance?
Yes, it restores normal battery life and overall usability.